





Blog
How to Choose the Right Electrical Plug Lockout?
Choosing an Electrical Plug Lockout is not a matter of picking the largest device on the shelf. It must fit the plug body, cover the blades, and accept a personal padlock without slipping. A loose fit can leave room for someone to reconnect the cord. A bulky device may not fit behind a machine or inside a crowded panel area. Small details matter.
Electrical-safety educator James R. White offers a useful selection principle: “A lockout must fit the plug securely to help prevent reconnection.” Treat that as a practical reminder, not a substitute for your site’s documented energy-control procedure. Check the plug’s shape and dimensions, the cord’s exit angle, and the space available around the receptacle. Then confirm that the device closes fully and stays in place when gently tested. No guesswork.
The right Electrical Plug Lockout should also suit the people who use it. Can workers see the lock? Can they identify whose lock is attached? Is the device durable enough for the dust, oil, or repeated handling found in that area? These are ordinary questions, yet they expose weak choices. A product photo cannot prove a secure fit. Measure the actual plug, test compatibility under controlled conditions, and record the model that works. Even then, review the choice when equipment changes. That step is easy to overlook.
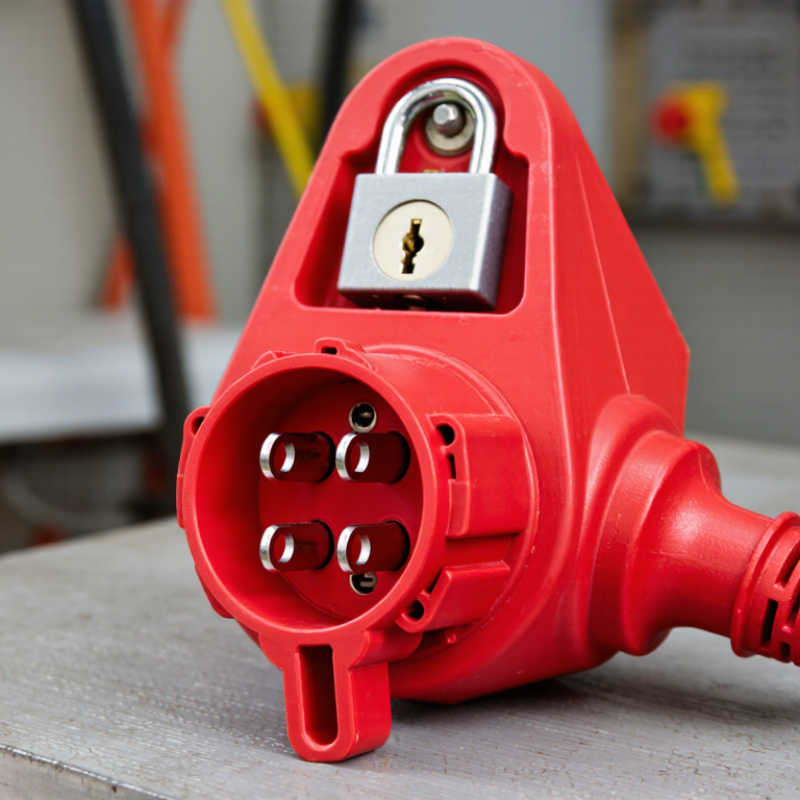
What an Electrical Plug Lockout Is and How It Works
An electrical plug lockout is a rigid enclosure that captures a plug and blocks access to its receptacle. It works by placing the unplugged connector inside the device, closing the cover, and securing it with an authorized padlock. The lock prevents reconnection during maintenance. That distinction matters: the device controls the plug, but it does not prove the circuit is de-energized.
OSHA’s Control of Hazardous Energy guidance estimates that effective lockout/tagout practices prevent 120 fatalities and 50,000 injuries annually. The Bureau of Labor Statistics recorded 145 fatal workplace injuries involving electricity in 2022. These figures support careful selection, not guesswork. Measure the plug length, width, grounding shape, and cable diameter before choosing a lockout. Check whether it accepts the required number of personal locks. In a workshop, a tight cover around a thick orange cord can expose the latch or strain the cable. Small mismatch. Big risk.
Choose a device suited to the plug configuration and the surrounding heat, dust, and moisture. Confirm that the enclosure cannot be removed without deliberate force or key control. A competent worker should isolate the disconnect, release stored energy, and verify voltage absence with a properly rated tester. Then apply the plug lockout and personal lock. Field experience reveals a weakness: workers sometimes treat a warning tag as equal to physical restraint. It is not. Review fit during actual use, because catalog measurements may miss bent blades, worn insulation, or unusual plug shapes.
How to Choose the Right Electrical Plug Lockout? — What an Electrical Plug Lockout Is and How It Works
| Topic | What to Know | Selection or Use Guidance |
|---|---|---|
| What it is | An electrical plug lockout is a device that encloses or secures an unplugged electrical plug so it cannot be reconnected to an outlet. | Choose a device designed for the plug’s shape and dimensions, including the plug body and cord exit. |
| How it works | The plug is disconnected from its power source and placed inside the lockout device. The enclosure is closed and secured with a personal safety padlock. | Keep the plug under the control of the person performing the work. Do not treat the device as a substitute for verifying that equipment is de-energized. |
| Plug size and shape | Plug bodies vary in width, length, thickness, pin arrangement, and cord-entry position. Some lockouts accommodate a range of plug sizes; others fit only specific dimensions. | Compare the manufacturer’s stated capacity with the actual plug. Check that the enclosure closes fully without crushing or sharply bending the cord. |
| Voltage and current rating | These values describe the electrical circuit or equipment, not necessarily the mechanical fit of the lockout. A plug lockout does not interrupt current by itself. | Confirm that the plug and equipment are suitable for the circuit. Follow the equipment instructions and site lockout/tagout procedures. |
| Number of workers | A lockout point may need to accommodate more than one authorized worker during group work. | Check the number and size of lock holes. Each worker should apply their own personal lock when required by the site’s procedure. |
| Material and environment | Construction materials and design affect durability and suitability for conditions such as impact, moisture, dust, or temperature variation. | Select a device rated or recommended for the work environment, and inspect it for cracks, deformation, or worn locking features before use. |
| Cord protection | The cord must exit the enclosure without being pinched, cut, or subjected to excessive strain. | Choose a compatible cord opening and route the cord so the device does not damage insulation or create a trip hazard. |
| Basic application steps | Notify affected workers, shut down equipment, disconnect the plug, secure the plug in the device, and apply the required lock and identification tag. | Follow the site’s written energy-control procedure and applicable regulations. Only authorized workers should perform lockout work. |
| Verification | A plug lockout helps prevent reconnection but does not prove that all hazardous energy has been removed. | Verify isolation using the method specified by the equipment instructions and site procedure. Address stored or alternate energy sources as required. |
| Before purchase | Compatibility depends on the plug, cord, lock, work conditions, and the organization’s lockout/tagout process. | Measure representative plugs, check lock compatibility, review the device instructions, and confirm suitability with the responsible safety professional. |
Safety note: A plug lockout is one part of an energy-control procedure. Use it only as instructed, and follow applicable workplace requirements and equipment-specific procedures.
How to Identify the Plug Type and Its Dimensions
How to Choose the Right Electrical Plug Lockout?
Choosing a plug lockout begins with identifying the plug, not the lockout device. Check whether it has two or three pins, a grounding contact, and a straight or angled body. Record the plug’s length, width, and height with a ruler or caliper. Small differences can affect fit. Measure the cable diameter too, because the entry hole must close around the cord without crushing it.
Match the lockout’s internal space to the entire plug body. Include the strain relief and any raised edges near the pins. Compare the plug’s voltage and current markings with equipment records before selecting a device. These details confirm that the lockout suits the application, although they do not replace an electrical risk assessment. In field inspections, technicians sometimes measure only the plug face. That shortcut can cause clearance problems.
Tips: Take clear photos from several angles. Measure an attached plug, not a loose sample. Check whether the plug needs room to rotate inside the enclosure. Test the lockout with the equipment disconnected, then inspect the closure for gaps. A perfect-looking fit may still fail if the cord bends sharply. Record your measurements for future maintenance, and review them when the plug design changes.
How to Assess the Equipment and Lockout Requirements
How to Choose the Right Electrical Plug Lockout?
Assessing equipment starts with the plug, not the lockout device. Record the plug type, voltage, cord diameter, and available clearance. A device that fits one plug may fail on another.
Check whether the plug can be fully enclosed and secured with a personal padlock. Examine nearby outlets, extension cords, and tight spaces behind equipment. The enclosure should prevent reconnection without visible damage or easy bypass. Do not guess. Confirm that the plug is disconnected and remains under the authorized worker’s control. If the plug is not within sight, review the site’s approved energy-control procedure. Other energy sources may also exist, including capacitors, batteries, or automatic start circuits.
During a site inspection, I look for worn insulation, cracked housings, and cords crossing walkways. These details often reveal a bigger control problem. Small details matter. Match the lockout device to the equipment’s actual conditions, not a catalog picture. Test the fit before maintenance begins, and verify that the locked plug cannot be pulled free. A second worker should review the isolation steps when the equipment is unfamiliar. This simple check can expose assumptions.
Use durable materials for wet, dusty, or outdoor work areas. Confirm that labels remain readable after handling. Follow applicable workplace safety requirements and the equipment manufacturer’s instructions. A good selection should be practical, identifiable, and difficult to defeat. Yet no device replaces isolation verification. That part is easy to overlook.
How to Choose the Right Electrical Plug Lockout
Assess the equipment’s plug configuration and electrical rating before selecting a lockout.
Common NEMA configurations shown: 5-15 and 5-20 are rated 125 V; 6-15 and 6-20 are rated 250 V. The bars show their ampere ratings, not lockout compatibility. Check the actual plug dimensions, cord exit, and the lockout manufacturer’s fit range. De-energize equipment and verify isolation according to your facility’s lockout/tagout procedures.
How to Compare Lockout Devices, Materials, and Safety Features
How to Choose the Right Electrical Plug Lockout?
Choosing an electrical plug lockout starts with the plug, not the product photo. Measure the plug body, cord diameter, and available clearance around the outlet. A loose device may slide off during maintenance. A tight device may damage the cable or delay emergency access. In hands-on maintenance settings, fit is often the overlooked failure point. Test the lockout with the actual plug before purchasing in quantity.
Material selection matters under real workplace conditions. Impact-resistant polymer suits general indoor use and keeps the device lightweight. Stainless steel or reinforced materials may perform better near heat, oils, dust, or repeated handling. Check hinge strength, locking points, and resistance to cracking. Color contrast and large labels help workers identify an isolated plug quickly. They should remain visible after cleaning.
Safety features deserve a practical comparison. Look for space for authorized locks, tamper-resistant construction, and secure cable entry. Some devices accept several locks, supporting group maintenance. Others provide only one locking position, which can create delays. The lockout itself is not electrical protection; qualified workers must still verify de-energization using approved procedures. Try-start checks are easy to skip. That is a weakness worth admitting. A device can meet specifications yet feel awkward with gloves, poor lighting, or cold hands. Review those conditions before selecting the final design.
How to Verify Fit and Compatibility Before Use
Choosing the right electrical plug lockout begins with one practical question: does it fully fit the plug in use? A device that looks secure may still leave gaps around the plug body or cable. Before purchase, measure the plug’s length, width, thickness, and cable diameter. Compare those measurements with the manufacturer’s published range. Check the plug shape, grounding pin position, and available clearance around the outlet.
Test the lockout on the actual plug, not only on a sample unit. The cover should close completely, resist twisting, and prevent access to the plug blades. Pull gently on the cord and device. It should stay aligned without stressing the cable. Confirm that the lock can close and that the assigned tag remains visible. These small checks are easy to skip. They should not be.
OSHA’s Control of Hazardous Energy fact sheet estimates that effective lockout/tagout practices prevent about 120 fatalities and 50,000 injuries annually in the United States. Fit verification supports that protection, but it does not replace energy isolation. A qualified worker should identify the circuit, disconnect it, and verify zero energy with properly rated test equipment. Try-start verification is also important. Environmental details matter too. Dust, moisture, heat, and chemical exposure can change material performance. ANSI/ASSP Z244.1 also emphasizes that energy-control devices must reliably prevent unexpected energization. Recheck the fit after equipment changes. One overlooked adapter can invalidate an otherwise careful selection.


